No fish were harmed in this experiment.
The term “PID control” stands for Proportional, Integral, Derivative control. It’s used in everyday products like a hot water pot and a car’s cruise control and is able to keep a system at a set target temperature or speed fairly precisely over time even though external disturbances (hills, increases in ambient temperature, adding of more cold water), are happening.
Most thermostats on the other hand, like the ones controlling the heater in an older home, an oven, or an aquarium heater, often use a simpler, cheaper mechanical control based on a coil of two metals that lengthen at different rates in response to heat. These are usually sufficient for the task but they can break.
PID control for an aquarium heater is probably not necessary, but this was a technique I wanted to gain experience with. The simple set point approach in the aquarium project resulted in water temperature swinging over a 0.3 degree Fahrenheit range over a 15 minute period. The betta fish would probably not notice that difference and remain healthy all the same.
As noted in the wikipedia article on PID control the D (derivative) component of PID control is seldom used in practice. Some students say it stands for “Disaster”, “Danger” or “Do not use” and in my application, I didn’t need to use it either, or rather I didn’t have the sophistication or patience to implement a robust measure of the error differential component. I chose to only use PI (proportional, integral) control. I could probably compute the derivative of a slow moving value, but if it wasn’t needed to get an adequate control result, then wasn’t worth the extra implementation effort at this point. There was still an oscillation around the set point, but for this application, the observed +/- 0.1 degree F (0.2 degree F range) was ok.
For this updated implementation, I also added a watchdog to restart the whole process if the temperature polling loop hung for whatever reason. However I have not seen it hang yet.
I used the ivmech PID library and I tuned the parameters by hand. After some trial and error ultimately, for the aquarium heater and environment, I settled on these parameters:
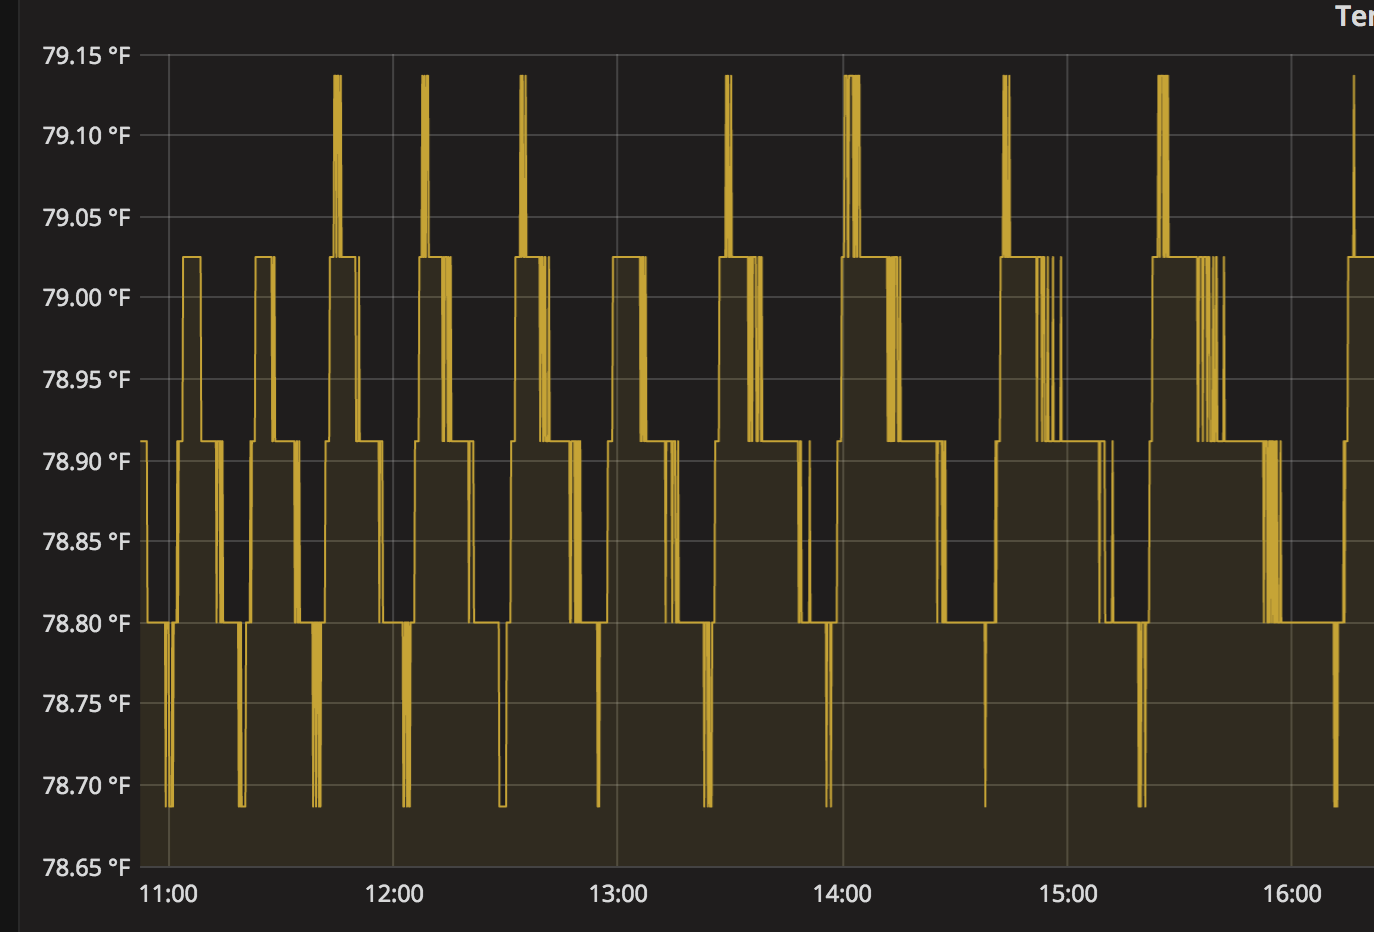
$$ \begin{aligned} K_p &=2 \newline K_i &=0.1 \newline K_d &=0 \end{aligned} $$This is the temperature behavior before (simple set point with on at 78.7, off at 78.9). This shows 0.3 degree F range and occasionally 0.4.
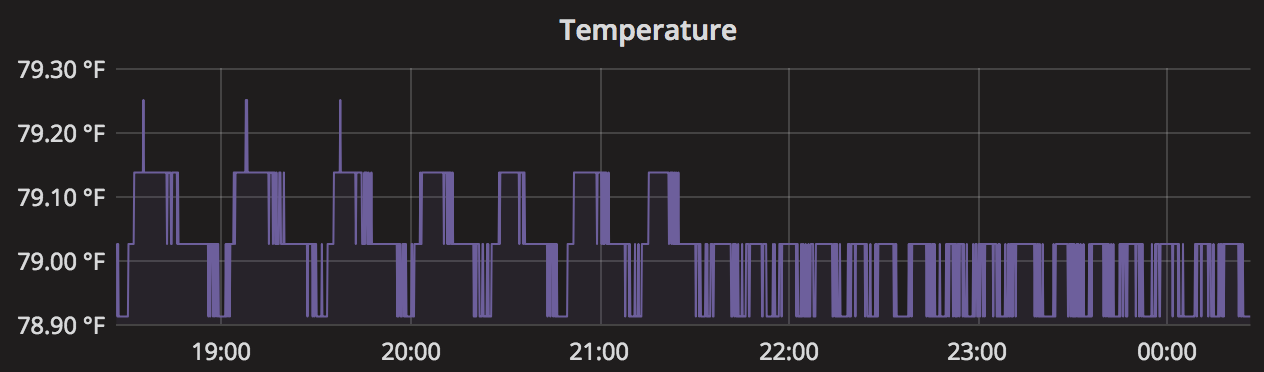
This is the temperature behavior after (initial PID settings targeting 79.0). This shows 0.2 degree F range and occasionally 0.3:
I later found out there was an Arduino library for PID control written by Brett Beauregard that has a bit of helpful instruction. This would be a good implementation to port to a Python library for the Raspberry Pi for future projects.
I also found from Brett’s blog that there is a good, free online book about PID control design and tuning at controlguru.com.
After learning about the Arudino PID library and its autotuning library, I double-checked what it suggested as parameters. Following the autotuning method detailed here I computed new parameters below.
The automatic tuning would cycle the control output (heater on/off) within a temperature range and measure the cycle time between heating, cooling and heating again. I had this data already from the earlier simple thermostat behavior, so I could compute these directly.
Where:
$$ \begin{aligned} D &= 1\space (\text{i.e. 100\% - 0\%}) \newline A &= 0.3\space (\text{79.0-78.7})\newline P_u &= 84 \space \text{periods (see note below)} \end{aligned} $$and
$$ \begin{aligned} K_u &= 4 \frac{D}{A P_i} = 4.244 \newline K_p &= 0.4 K_u = 1.698, \newline K_i &= 0.48 \frac{K_u}{P_u} = 0.0243 \end{aligned} $$\(K_i\) is now much less influential than the hand tuning (0.02 vs. 0.1) and \(K_p\) is a bit less than hand tuning (1.69 vs. 2.0)
Note: The thermocouple is sampled every 10 seconds in the implementation, so \(P_u\) has to be in units of the sampling period, i.e. 84 instead of 840 seconds. The period 840 seconds (14 minutes) was how long it took for heater to heat the water up \(A\) degrees, cool back down \(A\) degrees, and heat up again when moving between 100% heat (on all the time) and 0% heat (off all the time).
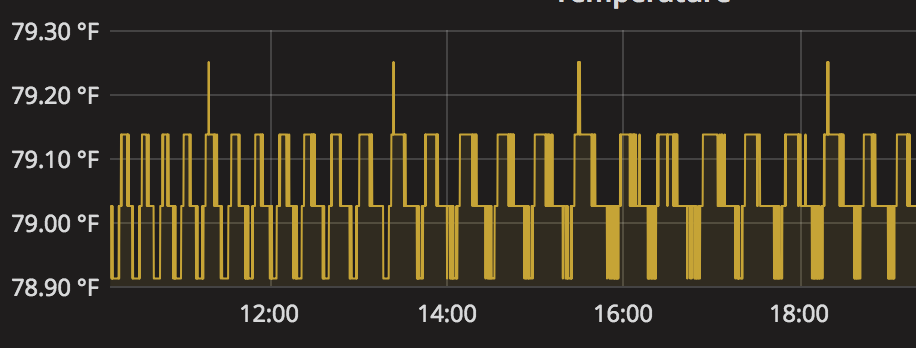
So, I tried those parameters instead. This is the resulting graph of the temperature response before and afterwards. The range of temperature looks more like a 0.1 degree F range instead of 0.2 degree F as before with the trial and error tuning. So, with a slight tuning through measurement, the system is achieving even more precise control.